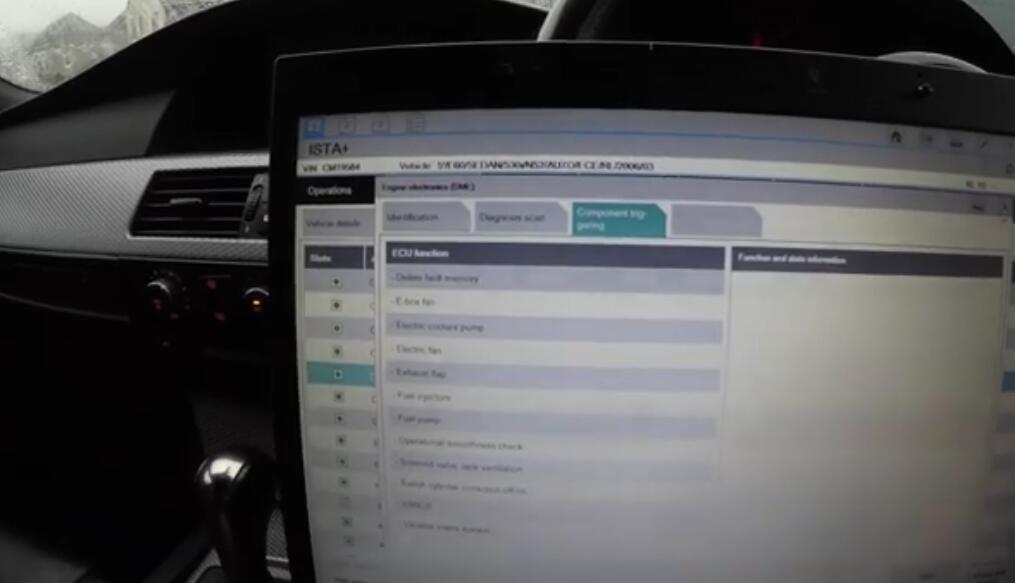
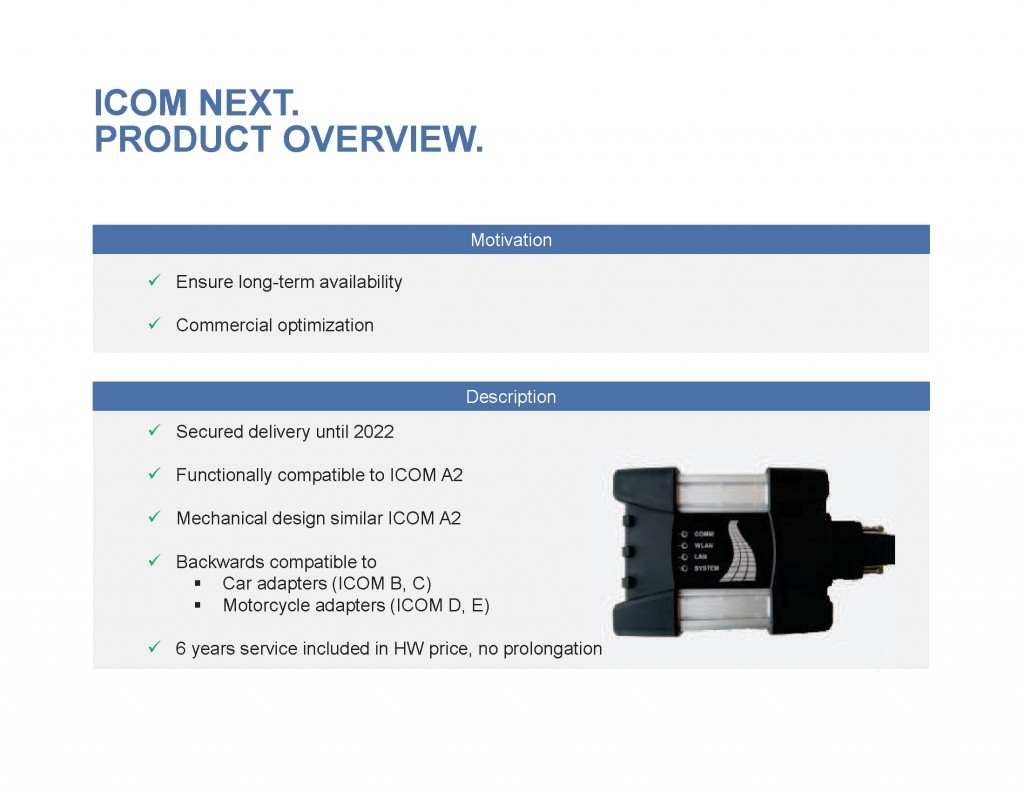
Showing posts with label icom a2 new generation. Show all posts

Friday, February 11, 2022

How to Use BMW ICOM Next ISTA Software Diagnose BMW Cars

BMW ICOM NEXT Latest Generation Diagnostic Head For BMW, MINI, Rolls-Royce BMW-Model. Can Replace BMW ICOM A2, including all function of ICOM A2. BMW ICOM NEXT not support WIFI. ICOM NEXT can works together with ICOM Software we provided.

1.BMW ISTA software requires BMW ISTA ICOM NEXT or ENET cable to connect to BMW cars

How-to-Use-BMW-ICOM-Next-ISTA-Software-Diagnose-BMW-Cars-1
How-to-Use-BMW-ICOM-Next-ISTA-Software-Diagnose-BMW-Cars-2

2. Operations-New-Read out vehicle data-complete identification

How-to-Use-BMW-ICOM-Next-ISTA-Software-Diagnose-BMW-Cars-3
How-to-Use-BMW-ICOM-Next-ISTA-Software-Diagnose-BMW-Cars-4

3.Connect

How-to-Use-BMW-ICOM-Next-ISTA-Software-Diagnose-BMW-Cars-5

4. Read control unit tree(Read ecu)

How-to-Use-BMW-ICOM-Next-ISTA-Software-Diagnose-BMW-Cars-6

5.Read Fault memory

How-to-Use-BMW-ICOM-Next-ISTA-Software-Diagnose-BMW-Cars-7

6.Test plan

How-to-Use-BMW-ICOM-Next-ISTA-Software-Diagnose-BMW-Cars-8

7.Wiring Diagram

How-to-Use-BMW-ICOM-Next-ISTA-Software-Diagnose-BMW-Cars-9

8.Demonstration of car disassembly and installation

How-to-Use-BMW-ICOM-Next-ISTA-Software-Diagnose-BMW-Cars-10

More interesting for BMW ICOM diagnostic tools , welcome to check our website www.obd2tool.com

Wednesday, November 10, 2021

How to Fix BMW ICOM NEXT not work

Do update Emergency Firmware on BMW ICOM Next for fix troubles when it not find IP address or all LEDs show Red Color
ICOM NEXT Error:

I have one BMW ICOM Next bought from China have been use 2 years great ,but sundenly it stop work .It will not connection any Vehicles and Programmer says Etherenet can’t find IP address . the ICOM NEXT mux all LEDS going Red and the System LED blinking Red-Yellow .
BMW ICOM NEXT not work Soultion :

1.Go to check BMW ICOM programmer Directory :C\ProgramData\BMW\ISP\data\TRIC\ICOMNEXT\ICOM-Image-XX-YY-ZZ( Show hidden files if you not find it ),if there have more than one ICOM-Image-XX-YY-ZZ file ,then choose the most recent one for last updates .

2.Copy the file ICOM_Next_app_yyyyyy.tar.gz and ICOM_Next_rootfs_xxxxxx.tar.gz to Your USB Disk ROOT Directory(Important) .

3.Disconnect ICOM NEXT Mux from Power adapter or Vehicle,And pull the USB Disk to ICOM’S USB port

4.Press the Reset Button and keep Hold,another Hand held the OBDII Cable with vehicles diagnotic socket(Start Engineer for supply power ),the whole LEDS will glow red.

How-to-Fix-BMW-ICOM-NEXT-not-work

5.Now release the reset button ,Press again 3 times within 4 seconds. After there will be going do firmware update

6.Wait several minutes until all LEDS stop glowing(Do not disconnect ICOM mux as long as any LED glows red)

7.The emergency firmware update is finised !now you can pull out USB Disk and try Connect LAN Cable to vehicle for Test .all setting will need be reconfigured since it have been lost .

If you want to know more about bmw diagnositc tools, please click bmw trouble repair.

Sunday, November 7, 2021

How to Get BMW ICOM Next Activation Key

I recently bought a BMW ICOM Next emulator with latest HDD.  It asks me to enter activation key when run ISTA-P 3.67.1. Where can i get this activation key?

How-to-Get-BMW-ICOM-Next-Activation-Key-1

Obd2tool.com solution:

How-to-Get-BMW-ICOM-Next-Activation-Key-2

Open TOOLS folder on desktop

How-to-Get-BMW-ICOM-Next-Activation-Key-3

Open ISTAP key folder

How-to-Get-BMW-ICOM-Next-Activation-Key-4

Open Activation Key- Loader V6.4L text file

Copy and paste activate key to corresponding area

How-to-Get-BMW-ICOM-Next-Activation-Key-5

ISTA-P is activated successfully.

If you want to know more about bmw diagnositc tools, please click bmw trouble repair.

Wednesday, September 8, 2021

How to Solve ICOM Next cannot be found by Itool Radar Software


Problem: I have a BMW ICOM Next. I upgraded firmware for it. Now it cannot be find by itool radar software. I tried restore using USB flash method. However when I reset Icom by press and hold the pin hole near USB port, but does not happen on my Icom Next.

How-to-Solve-ICOM-Next-cannot-be-found-by-Itool-Radar-Software-1 (2)
How-to-Solve-ICOM-Next-cannot-be-found-by-Itool-Radar-Software-2 (2)
How-to-Solve-ICOM-Next-cannot-be-found-by-Itool-Radar-Software-3 (2)

How to restore this Icom Next?

SOLVED by re-injecting via USB key files : “USER.settings” and “user.settings.log”  (can find in “Restore ICOM.7z” in ISTA installation package)
ICOM IP address was lost and now all OK !!!!

Thursday, September 2, 2021

How to Sovle BMW ICOM NEXT not connecting to ISTA


Got BMW ICOM NEXT not connecting to ISTA because it need firmware update I try to login with internet explorer but I didn’t get the setup page. I don’t know if it’s IP problem or what.

How-to-Sovle-BMW-ICOM-NEXT-not-connecting-to-ISTA-1 Here is the itool radar shot:

Advice:

Try that: 192.168.8.1:60080
LOG IN with following:
Username: root
Password: NZY11502  or NZY1150263
How-to-Sovle-BMW-ICOM-NEXT-not-connecting-to-ISTA-2

Download iTool Radar, connect the ICOM directly to your computer, and it should read the ip address from the ICOM.  Once you have the IP address, then you can proceed to log onto it using chrome or microsoft explorer browser with the provided credentials above.

If you did exactly as above, but with no luck. Then make an restore usb and reflash with this!

Download from this mega: BMW_ISPI_ICOM_NEXT_FW_3.15.03_files.txt

https://mega.nz/#!UJRllQRK!UIBddM2M8dXo2D5yf8Seluz-TuHiU4yCdnjvLiZOP8A

Then create a restore USB by following the following instructions:

A portable USB mass storage device (USB stick) that is at least compliant with USB 2.0 and is formatted with the FAT32 file system is required as additional hardware.

1. Create a text file user.settings with the following content: ConnectionMode=xxxxxx * 1 (default *2 : DHCP) Ip=xxx.xxx.xxx.xxx (default: 0.0.0.0)
Netmask= xxx.xxx.xxx.xxx (default: 0.0.0.0)
Gateway=xxx.xxx.xxx.xxx (default: 0.0.0.0)

Pay attention to the upper and lower case letters!

* 1 Possible parameters for ConnectionMode: STATIC_IP, DHCP, APIPA * 2 default = factory settings

2. Copy the file user.settings onto the USB stick.
3. If the ICOM NEXT A is ready for operation (SYSTEM LED permanently lights up green), the USB stick is to be connected to the unit (a connected MOST diagnosis adapter is to be unplugged). The red light chain starts after approx. 10 seconds (see 4.2.7.).

The saved settings are persistently overwritten. The green light chain starts once all the data has been updated. In this state, the unit can be addressed at the new IP (even without a restart). If the red light chain does not start, the user.settings file on the USB stick could not be read. If the green light stays off, an error has occurred while the LAN configuration was being written. For analysis purposes, the ICOM NEXT A saves the file user.settings.log with the error description to the USB stick.

or possibly as follows after that you copy the necessary files:

1.3. Connect the USB stick to the ICOM Next.

1.4. Press and hold the button located on the right-hand side of the ICOM Next, next to the OBD II cable connection socket.

1.5. Continue to hold the button, connect the device to the vehicle’s OBD II jack and keep the button pressed until the LEDs on the ICOM Next glow red.

1.6. Release the button and within five seconds, push the button three times. This starts the firmware update.

Note: The update may take several minutes. Do not disconnect the ICOM Next as long as any LED glows red.

1.7. When all LEDs on the ICOM Next have stopped glowing, the Emergency Firmware Update is complete. You can now disconnect the USB flash drive.

1.8. IMPORTANT: When the Emergency Firmware Update is finished, the ICOM Next must be connected to your network with a LAN cable in order to be reconfigured since all previous settings have been lost. If there is a “user.settings” file on the USB flash drive, it will be installed after the firmware update.

Final update:

This login is for original next or clone/orig A1, A2 for sure.

I try to login to ip: 192.168.8.1

LOG IN with following:

Username: root

Password: NZY1150263

Hope it helps!

Best source of BMW ICOM Next:

Monday, August 16, 2021

How to Diagnose and Program your BMW with ISTA/D


The BMW ISTA/D is a current dealer-level diagnostic software commonly used for all E Series and F Series BMW vehicles. It replaces the older version DIS diagnostic software. The ISTA/D software can be used in diagnosing all BMW models but it can only program BMW F-/I-/G-/Mini/RR series cars and beyond. It does not support programming for E Series models.

How to use the ISTA/D diagnostic software on your BMW vehicle.

How-to-Diagnose-and-Program-your-BMW-with-ISTA-D-1 How-to-Diagnose-and-Program-your-BMW-with-ISTA-D-2How-to-Diagnose-and-Program-your-BMW-with-ISTA-D-3
How-to-Diagnose-and-Program-your-BMW-with-ISTA-D-4
How-to-Diagnose-and-Program-your-BMW-with-ISTA-D-5
How-to-Diagnose-and-Program-your-BMW-with-ISTA-D-6

ISTA D, ISTA+, and Rheingold are the same and often used interchangeably. ISTA, which stands for Integrated Service Technical Application, developed from a folder file named Rheingold that contains BMW’s main application and data. Rheingold became ISTA/D later on – which D stands for Diagnostics. On the other hand, the P for ISTA/P stands for Programming.

Just like ISTA/P, ISTA/D requires the ICOM interface for the following purpose:

ICOM A: used for the main interface
ICOM B: serves as an adapter for programming multimedia in E series models
ICOM C: serves as adapter for old BMW models that uses the round 20 pin diagnostic plug
ICOM D: serves as an adapter for BMW motorcycles

BMW had categorized the application of ISTA/D into two parts – Programming and Diagnostics. Here’s how it is applied:

For Diagnostics:

Repair of software
Troubleshooting
Information guide for repair and maintenance
Vehicle identification and management.

For Programming:

Update of Software
Conversions and Retrofits
Replacement of Control Unit

Saturday, August 14, 2021

BMW Coding & Programming – Do you know the difference


BMW-Coding-&-Programming-Do-you-know-the-difference-1

What is Coding?

It is a process utilized by BMW, which groups system specific operating requirements (Data) together and then assigns a label/code to each of these groups of data. The various groups of data are all pre-loaded into system specific “codable” control modules, along with a basic set of operating instructions (Program).

There are various types of operating requirements such as; O2 sensors, emissions controls, fuel type, Manual or Auto transmission.

The procedure of assigning one specifically labeled group of data to the operating program of a specific control module/component is referred to as “coding”. Coding allows a specific set of data already present in the module to be selected.

A “codable” control module has a basic operating program already installed along with several specific variations of operating data. The coding process allows a specific set of operating data to be assigned to the basic operating program of that module/component, with respect to its specific application.

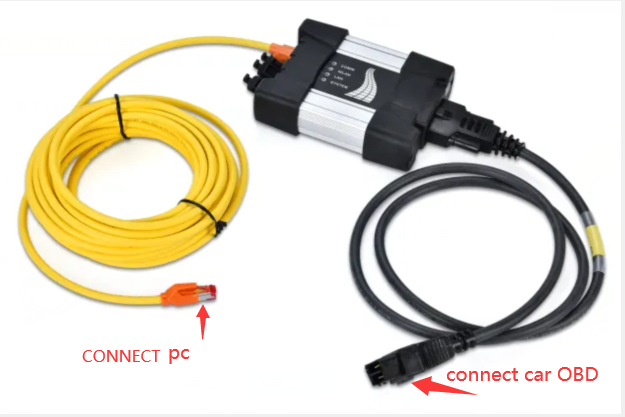
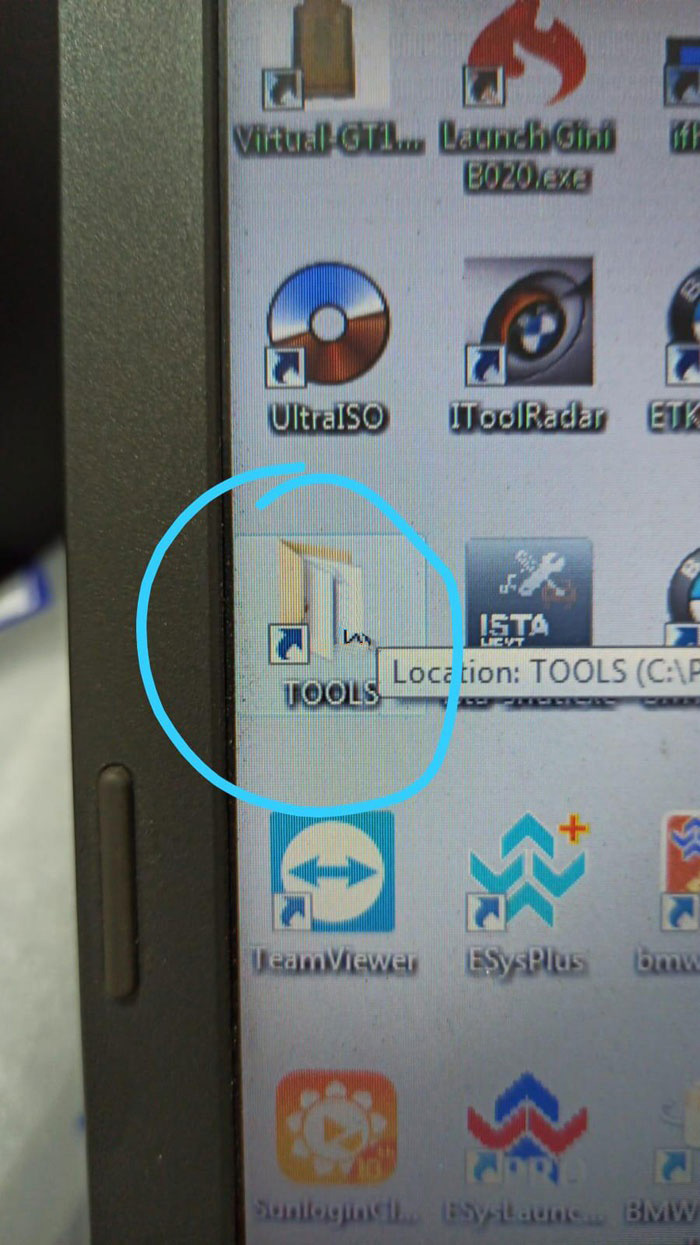
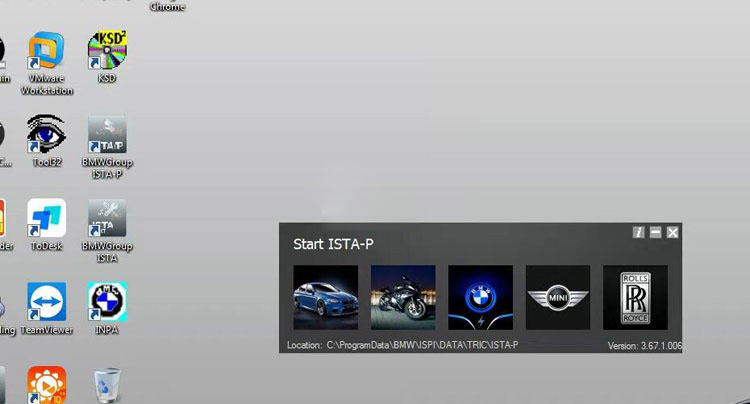
Coding can be performed for some systems/components via ISTA/P or the older DIS/Plus/GT1/SSS device. By entering a variant code via the device, selecting customer specific operational settings from a list of available features (VKM) or automatically by selecting a specific coding process.

Note: Codable control modules/components are system specific, which means that not all control modules are codable.
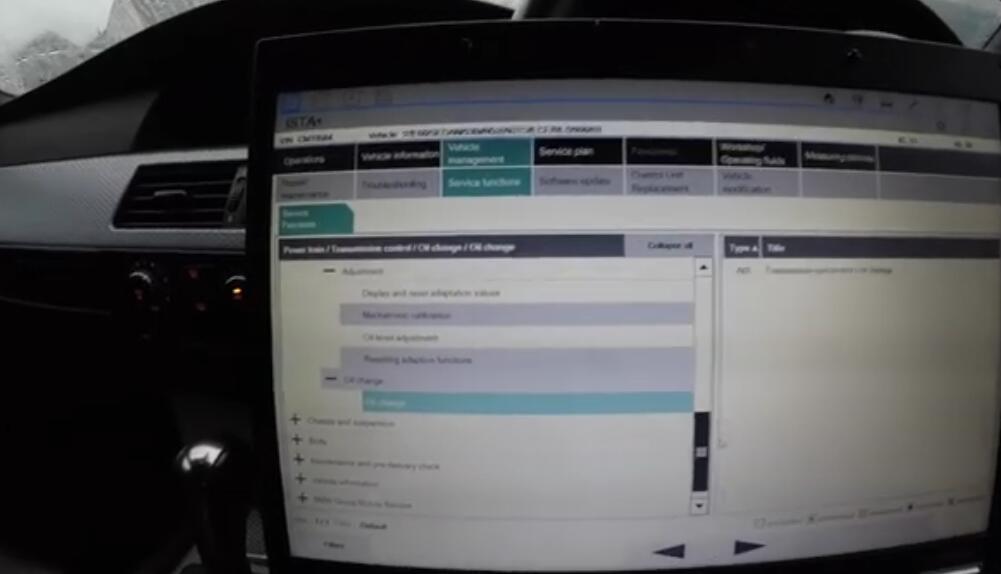
What is Programming?

It is a process utilized by BMW to load application/system specific operating instructions. Programming loads control functions instructions into a specific control module.

(Program) into a module/component which already has the systems operating requirements (Data) installed, plus it can be used as a means of updating data and operating instructions previously installed in a control module. Basic programmable control modules have a pre-defined set of operating data already installed which allows the module to be fairly generic until a specific operational program is installed.

The ability to program a module is limited to the number of times it has already been programmed and the hardware version of the control module itself.

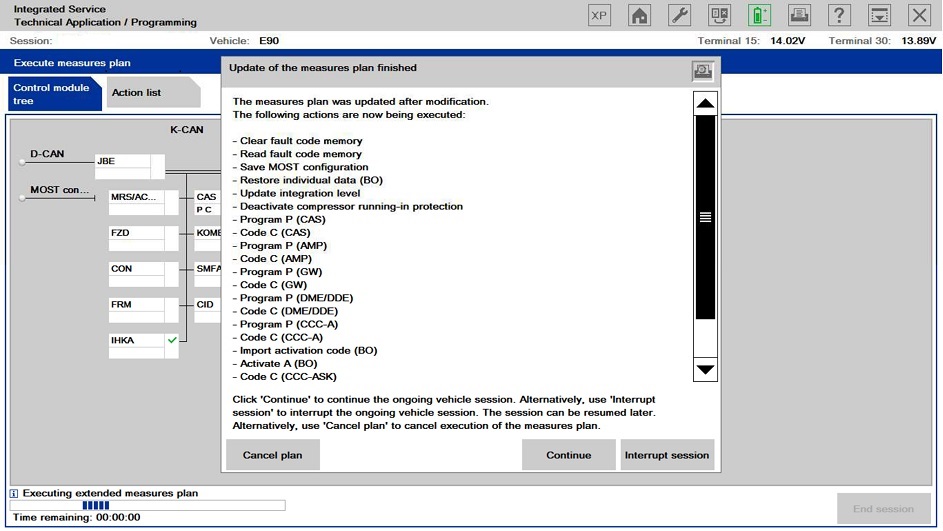
What is I-level (or Integration Level)?

The ECU’s in a BMW are not meant to be updated individually, rather as a collection which BMW tested and knows all work fine together. The collective version number of all programmed ECU’s is called the I-level, or Integration level (German: I-stufe). The term I-level was adopted by BMW around the year 2004 and applies only to lines which were in development/production in 2004 or after (E60, E70, E90, etc.).

The I-level is a set of numbers that looks like E89X-11-09-410. The first part represents the chassis group, which is followed by the year and month of the release and a build number for that release. So, E89X-11-09-410 would mean an E80/E90, 09/2011, version 410.

You will often see a set of two I-levels, something like E89X-05-10-026, E89X-11-09-410. In this case the first set is called the Factory I-level, or the level with which the car left the factory, and the second the Dealer Organization I-level, or the current version programmed by the dealer.
Tagged on: bmw encoding, bmw programming, E36, E39, E46, E60, E61, E63, E64, E65, E66, E67, E70, E71, E72, E81, E82, E84, E87, E88, E89, E90, E91, E92, E93, F01, F10

Thursday, August 12, 2021

How to Program and Code your BMW with ISTA/P


ISTA/P stands for Integrated Service Technical Application/Programming. It is a dealer-level diagnostic software that replaced the older version SSS Progman programming software. ISTA/P is primarily used for processing all coded, programmed, and enable-dependent control modules of BMW vehicles.

With the use of a K+DCAN or ENET cable, you’ll be able to diagnose, calibrate, read and delete memory errors, battery register, and code and program most your BMW vehicle modules.

How-to-Program-and-Code-your-BMW-with-ISTA-P-1
How-to-Program-and-Code-your-BMW-with-ISTA-P-6
How-to-Program-and-Code-your-BMW-with-ISTA-P-5
How-to-Program-and-Code-your-BMW-with-ISTA-P-4
How-to-Program-and-Code-your-BMW-with-ISTA-P-3
How-to-Program-and-Code-your-BMW-with-ISTA-P-2

ISTA/P should be used with an ICOM interface. To cover all your vehicle modules, you will need the ICOM A, ICOM B, and ICOM C for BMW vehicles that were produced before June 2001.

When programming with ISTA/P, you need to observe the following precautions:

• Always follow the instructions and requests given in ISTA/P.

• Leave your vehicle’s ignition switched on.

• Do not cut or interrupt the connection between your vehicle, the workshop network, and the vehicle interface.

• After any action initiated in the luggage compartment, always close the the boot lid to prevent overheating the luggage compartment lighting.

• You should not perform any other activity in your vehicle while programing aside from what is instructed by ISTA/P.

Tuesday, August 10, 2021

BMW ICOM Next – The next generation


BMW ICOM Next – The next generation of its diagnostic hardware was recently announced. Units are starting to trickle in around the world, as of today they are backordered on ICOM Next A 1,143 units. The price has been reduced dramatically over the previous ICOM A2. With a list price of around $800 its sure to impact the clone market.

BMW-ICOM-Next-The-next-generation-1
BMW-ICOM-Next-The-next-generation-2

BMW ICOM Next A

BMW-ICOM-Next-The-next-generation-3

BMW ICOM Next B
BMW-ICOM-Next-The-next-generation-4

BMW ICOM Next A – Inside

BMW-ICOM-Next-The-next-generation-5

Web interface is the same, Wi-Fi interface is Atheros AR9382 based mini PCI-E half sized card made by SparkLAN. Cypress CPU and gigabit Ethernet.

BMW ICOM Next – Inside

BMW-ICOM-Next-The-next-generation-6

SPECS:
• Zeroization of data on tamper detection
• Secure supply chain assurance
• Key storage using physically un-clonable function
• CRI Pass-Through DPA Patent Portfolio
• Advanced cryptographic Services

Complete Documentation Microsemi
See Product Brief PB0136

Saturday, July 31, 2021

How to Fix BMW ICOM Next IP Problem

Got BMW ICOM Next not connecting to ISTA because it need firmware update I try to login with internet explorer but I didn’t get the setup page. I don’t know if it’s IP problem or what.

How-to-Fix-BMW-ICOM-Next-IP-Problem-1

Here is the itool radar shot:

How-to-Fix-BMW-ICOM-Next-IP-Problem-2

Advice:

Try that: 192.168.8.1:60080
LOG IN with following:
Username: root
Password: NZY11502  or NZY1150263

Download iTool Radar, connect the ICOM directly to your computer, and it should read the ip address from the ICOM.  Once you have the IP address, then you can proceed to log onto it using chrome or microsoft explorer browser with the provided credentials above.

If you did exactly as above, but with no luck. Then make an restore usb and reflash with this!

Download from this mega: BMW_ISPI_ICOM_NEXT_FW_3.15.03_files.txt

https://mega.nz/#!UJRllQRK!UIBddM2M8dXo2D5yf8Seluz-TuHiU4yCdnjvLiZOP8A

Then create a restore USB by following the following instructions:

A portable USB mass storage device (USB stick) that is at least compliant with USB 2.0 and is formatted with the FAT32 file system is required as additional hardware.

1. Create a text file user.settings with the following content: ConnectionMode=xxxxxx * 1 (default *2 : DHCP) Ip=xxx.xxx.xxx.xxx (default: 0.0.0.0)
Netmask= xxx.xxx.xxx.xxx (default: 0.0.0.0)
Gateway=xxx.xxx.xxx.xxx (default: 0.0.0.0)

Pay attention to the upper and lower case letters!

* 1 Possible parameters for ConnectionMode: STATIC_IP, DHCP, APIPA * 2 default = factory settings

2. Copy the file user.settings onto the USB stick.
3. If the ICOM NEXT A is ready for operation (SYSTEM LED permanently lights up green), the USB stick is to be connected to the unit (a connected MOST diagnosis adapter is to be unplugged). The red light chain starts after approx. 10 seconds (see 4.2.7.).

The saved settings are persistently overwritten. The green light chain starts once all the data has been updated. In this state, the unit can be addressed at the new IP (even without a restart). If the red light chain does not start, the user.settings file on the USB stick could not be read. If the green light stays off, an error has occurred while the LAN configuration was being written. For analysis purposes, the ICOM NEXT A saves the file user.settings.log with the error description to the USB stick.

or possibly as follows after that you copy the necessary files:

1.3. Connect the USB stick to the ICOM Next.

1.4. Press and hold the button located on the right-hand side of the ICOM Next, next to the OBD II cable connection socket.

1.5. Continue to hold the button, connect the device to the vehicle’s OBD II jack and keep the button pressed until the LEDs on the ICOM Next glow red.

1.6. Release the button and within five seconds, push the button three times. This starts the firmware update.

Note: The update may take several minutes. Do not disconnect the ICOM Next as long as any LED glows red.

1.7. When all LEDs on the ICOM Next have stopped glowing, the Emergency Firmware Update is complete. You can now disconnect the USB flash drive.

1.8. IMPORTANT: When the Emergency Firmware Update is finished, the ICOM Next must be connected to your network with a LAN cable in order to be reconfigured since all previous settings have been lost. If there is a “user.settings” file on the USB flash drive, it will be installed after the firmware update.

Final update:

This login is for original next or clone/orig A1, A2 for sure.

I try to login to ip: 192.168.8.1

LOG IN with following:

Username: root

Password: NZY1150263

Hope it helps!

Friday, July 30, 2021

How to Restore BMW ICOM next A2+B+C SCANNER After Factory Reset

Problem:
How to restore BMW icom next a2+B+C after a factory reset? LAN doesn’t work after reset.

Answer:
You need to restore it with usb drive, here is the file you need and how to do it…… first restore then update …. you should search what is the last version of ista that support F

1.https://mega.nz/file/tBYzVSBY#imbaH6NeLbV7n7dutVb3BMXYMGLVw0Ear-HqTXUUZTs
icom_01_37_00 .rar
2.Update firmware BMW ICOM A/A2/A3 (The next paragraph will list the details)
3.BMW ICOM A/A2/A3 Factory Restore (The last paragraph will list the details)

Step-by-step procedure on BMW ICOM A1-A2-A3 Factory Restore
Perform a factory reset if you face one of the following issues:
1.Single ICOM with at least one green LED, but does not become visible in ISTA
2.Single ICOM with at least one green LED, but it is not available in Connection Manager and therefore cannot be reserved
3. Single ICOM is not working in WLAN
4 .Single ICOM with at least one green LED, but Firmware Update is not possible neither via ISTA nor via ICOM Web GUI

Prerequisites:
1.USB flash drive. 2.0 with a minimum of 60 MB free space formatted with FAT32 (e.g. by Microsoft Windows)
2.“ICOM_Restore.bin” file, which can be downloaded from this page. Make sure you always use the latest file for the factory reset

Fix: Perform the following steps:
1.Copy the “ICOM_Restore.bin” file to the USB flash drive
2.Disconnect the network cable from ICOM A
3.If ICOM A is placed in an OBD II jack of the vehicle, then pull it out (ICOM A must have status off”)
4.Connect the USB flash drive to ICOM A
5.This step has to be done in a maximum time of 5 sec or the update process will not start:
Press the reset button on the ICOM A and hold it pressed:


Connect ICOM A to the OBD II jack while the button is pressed (all LED will become red)
Release the reset button and then press it 3 times
The LEDs will flash red (if not, repeat the above steps)
The process is finished after 3 minutes
When the system LED is shining green, the update process is finished successfully
Disconnect to USB flash drive

6.Factory reset is done
7.Disconnect the ICOM A
8.Connect the LAN cable between the ICOM A and the network
9.Connect the ICOM A to a vehicle or external power supply
10.ICOM becomes visible now again in ISTA / work correctly again

Step-by-step procedure on BMW ICOM Upgrade:
1.First step is to make sure the LAN adapter is set to DHCP and is enabled, here is how to do it:
--Open Network Connections by clicking the Start button, and then clicking Control Panel.in the search box, type adapter, and then, under Network and Sharing Center, click View network connections.
--Right-click the connection that you want to change, and then click Properties. If you’reprompted for an administrator password or confirmation, type the password or provide confirmation.
--Click the Networking tab. Under This connection uses the following items, click either Internet Protocol Version 4 (TCP/IPv4) or Internet Protocol Version 6 (TCP/IPv6), and then click Properties.

The Network Connection Properties dialog box
--To get IP settings automatically using DHCP, click Obtain an IP address automatically,and then click OK.
--To get a DNS server address automatically using DHCP, click Obtain DNS server
address automatically, and then click OK.

2.Connect ICOM to the car and to the UTP cable provided in the package
--there should be 4 green leds powered on

3.Check that the network adapter has an IP like 169.254….

4.Using the web browser go to http://169.254.92.38:60080
User: root Password: NZY1150263

5.Select channels menu and click only once on the button available there:

6.Go to firmware update and update with ICOM-BootImage-01-11-01.bin, then with ICOMApplicationImage-01-15-01.bin, don’t reboot between parts:
-- at the image type we have selected System, now Browse for the ICOM-BootImage-01-11-01.bin and click on “Send the file” button and wait

--click on Yes and wait

--now click on Update Firmware to go and update with ICOM-ApplicationImage-01-15-01.bin

-- at Image type check the option called APPLICATION and Browse for ICOM-ApplicationImage-01-15-01.bin and click on “Send the file” button and wait

--click on Yes and wait

7.Reboot ICOM


8.After at least 2 minutes press on Home button and go to Update Firmware and check to see the firmware versions for boot is 1.11.01 and application is 1.15.01: